
Set up the Tplink CPE outdoor Extender in repeater mode and improve your outdoor WiFi connectivity. The CPE outdoor comes in client mode by default to connect the client end connection from ISP. This blog will show you how to configure TP-Link CPE as repeater mode to extend the wifi range.
How to set up the TP-Link CPE outdoor extender?
You need to establish a connection between the power adapter and your CPE device to start the setup process. Always try to connect over a wired connection instead of wireless.
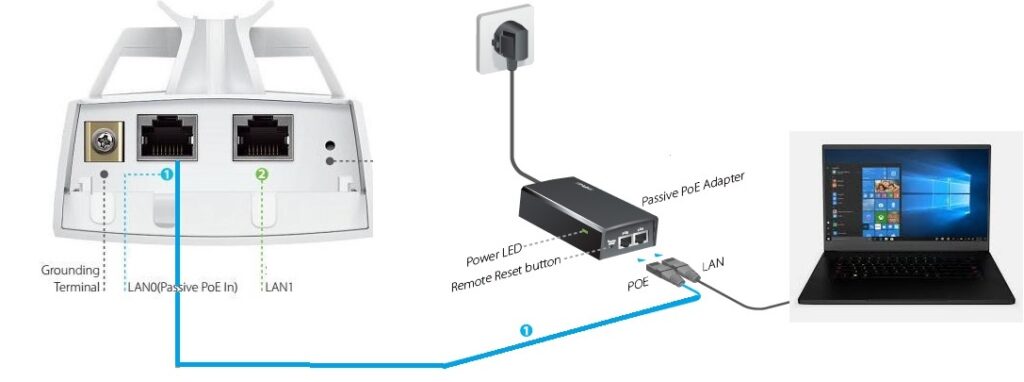
Hardware Setup
- Firstly, connect the Ethernet cable from the LAN0 port on the CPE to the power adapter’s PoE port.
- Secondly, connect your PC to the LAN port on the power adapter using another Ethernet wire.
- Finally, plug in the PoE adapter to an available power source.
Add IP Address
- Your computer and CPE must be in the same subnet to access your range extender.
- Open the computer’s control panel and navigate to the Network and Sharing Center.
- Click on the Network Connections.
- Next, click on Ethernet and then click on Properties.
- Now, specify the IP address and Subnet mask for the TP-link CPE extender.
- The default IP address of the TP-Link CPE is 192.168.0.254.
- You can assign to your computer 192.168.0.241 from CPE’s subnet/IP range. Click OK.
Login to the TP-Link CPE outdoor extender
- Open up a browser on the PC and type 192.168.0.254 the default IP of the Tplink CPE device.
- When a login screen appears, enter the username and password as admin in both the fields.
- Next, select your Region and Country code.
- Click on the Login button to log in to the TP-link outdoor CPE setup page.
- Next, you would be prompted to create a new ID and password.
- Enter a new username and password in the given fields and click on Next.
Run Quick Setup
- From the Quick Setup page, click on the Operation mode.
- And, then select the Repeater option. Click Next.
- Now, change the default IP of the tplink CPE outdoor extender to another IP to fit in the main router’s network.
- Click on Survey. The device will scan for the available networks.
- Choose your main router’s network name, select the security type, and then click on Connect.
- Next, select the same security type as the main router. Type in the same WiFi password of your home router for the PSK password. Click Next.
- Finally, disconnect the PC from the PoE adapter and place the CPE extender at a centralized location.
- Afterward, you need to set your PC back to obtain an IP address automatically.
Conclusion
This was all about how to set up your Tplink CPE outdoor extender. If you face any issues during the setup process, you can easily get rid of these problems using some troubleshooting tips. We have a technical team who helps you to fix the issues associated with the TP-link CPE extender. For more queries, you can directly contact our team of experts on the helpline number.